


Finding the low-pressure valve on your car's AC system (R12, R134a, R1234yf)
You have your refrigerant can, your recharge hose, you open the bonnet — and there you are, faced with a tangle of aluminium pipes, plastic caps of all colours, and you have no idea which of those two small ports is the right one. This is the classic stumbling block for any beginner trying to manage their own air conditioning. The good news is that once you understand the logic of the circuit, you will never make the wrong choice again. This guide explains step by step how to reliably identify the low-pressure valve on your car's AC system, regardless of the refrigerant used — R12, R134a or R1234yf — and how to handle tricky cases such as certain Renault vehicles that have only a single service port. You will also find all the suitable equipment in our refrigeration tools catalogue.
❄️ Why only the low-pressure side concerns us
Before physically looking for the ports, it is essential to understand why we only connect to the low-pressure side when recharging. Automotive air conditioning operates on a closed cycle in which the refrigerant circulates through four main components: the compressor, the condenser, the expansion valve and the evaporator. The compressor draws in refrigerant in its gaseous state at low pressure, compresses it to a high pressure (this is the high-pressure side), then this hot gas liquefies in the condenser before returning to the low-pressure side after the expansion valve.
When recharging an air conditioning system, the refrigerant is introduced on the suction side of the compressor, i.e. the low-pressure side. This is the only safe method for a private individual equipped with a simple can and a hose: the low-pressure side is on the suction side, so the gas from the can can naturally enter the circuit as soon as the can pressure exceeds that of the circuit. Connecting to the compressor's high-pressure side while it is running would, on the contrary, be extremely dangerous: the circuit pressure on the discharge side can rise well beyond the resistance of a simple domestic can, with a real risk of bursting. It must never be done on a standard two-port system.
❄️ Reading the label under the bonnet: the mandatory first step
Before touching anything, open the bonnet and look for the air conditioning circuit label. It is usually stuck on the fluid reservoir, on the compressor itself, or near the condenser. This label shows two crucial pieces of information: the type of refrigerant used (R-12, R-134a or R-1234yf) and the nominal charge in grams. These two data points determine which equipment to use and which connector size to look for. Without this preliminary check, you risk trying to connect an incompatible coupler, which is not only pointless but potentially dangerous.
The type of refrigerant depends on the vehicle's manufacturing date. Cars made before 1995 use R-12, an older refrigerant now banned from sale to private individuals due to its impact on the ozone layer. Vehicles manufactured between 1995 and the end of 2016 use R-134a in the vast majority of cases. Since 1 January 2017, European regulations require R-1234yf for all new models. These three gases use fittings of different dimensions, and this deliberate incompatibility is a safeguard: it prevents accidentally introducing the wrong fluid into a circuit.
| Refrigerant | Period | Port type | Low pressure | High pressure |
|---|---|---|---|---|
| R-12 | Before 1995 | Screw-on fittings (SAE) | 1/4" SAE (7/16"-20 UNF) | 1/4" SAE (7/16"-20 UNF) — same thread! |
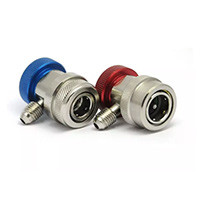
| R-134a | 1995 – end of 2016 | Quick-connect fittings | 13 mm (blue cap) | 16 mm (red cap) |
| R-1234yf | Since January 2017 | Specific quick-connect fittings | 14 mm (often grey cap) | 17 mm (often grey cap) |
The R-12 case deserves particular attention: both ports have exactly the same 1/4" SAE (7/16"-20 UNF) thread. There is therefore no mechanical protection against incorrect connection, unlike R-134a and R-1234yf. On these older vehicles, identification by hose diameter (described below) is absolutely mandatory to avoid any risk. Browse our selection of automotive parts and supplies for fittings suited to each type of circuit.
❄️ Physically locating the low-pressure valve step by step
Now that you know your refrigerant type, let's move on to the physical location. The most reliable method starts by identifying the air conditioning compressor in the engine bay. The compressor is a cylindrical component, usually mounted low on the side of the engine, driven by a belt. To distinguish it from other components (alternator, power steering pump, etc.) without needing a diagram, here is a very effective trick: start the engine without turning on the air conditioning. All components driven by the belt rotate — except the AC compressor, whose magnetic clutch remains disengaged. The compressor is therefore the only element on the belt whose central pulley stays still. This makes it easy to identify, even without knowing its exact shape.
Once the compressor is located, turn off the engine and observe the two aluminium tubes connected to it. One is noticeably wider than the other. The large tube is the low-pressure line (this is the suction line, which carries gaseous refrigerant to the compressor) and the narrow tube is the high-pressure line (this is the discharge line, which carries compressed gas to the condenser). This rule applies to all vehicles, regardless of the refrigerant. Now follow the large tube from the compressor: it runs up towards the evaporator (located behind the dashboard) passing through the engine bay. Along its route, you will find a small perpendicular protrusion on the tube, topped with a plastic cap. That is your low-pressure service port.
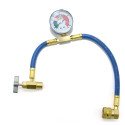
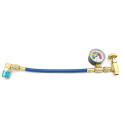
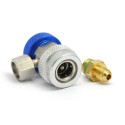
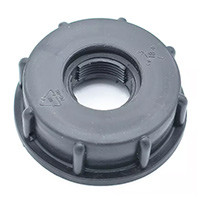
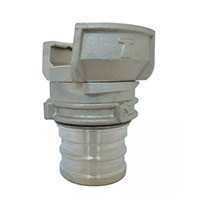
These ports can be located anywhere in the engine bay — sometimes near the compressor, sometimes close to the firewall, sometimes hidden under protective covers. Take the time to trace the hose along its full length if necessary. Once you have found the port, you can confirm it is the right one by simply presenting the coupler from your hose against the port without clipping it on: if the diameter matches, the coupler slides on and fits easily. If it does not go on or is too large, it is either not the right port or not the right coupler. Browse our range of fittings to find the coupler that matches your circuit.
On most vehicles, the protective caps are marked with the letters "L" (Low pressure) and "H" (High pressure). The "L" cap is often blue on R-134a circuits, grey on R-1234yf. Be careful however: cap colours are not strictly standardised across manufacturers. A black or unusually coloured cap does not necessarily mean it is the high-pressure port. The engraved letter and the tube diameter remain the most reliable criteria.
If you want additional confirmation, start the engine and turn the air conditioning on full for two minutes. The low-pressure tube (suction) becomes cold, sometimes to the point of misting over with condensation. The high-pressure tube (discharge) is on the contrary very hot — do not touch it. This temperature difference unambiguously confirms which tube is which. This check should only be done for confirmation purposes, after turning off the engine before making any connection.
In R-134a systems, the low-pressure port measures 13 mm and the high-pressure port 16 mm: the different sizes prevent cross-connection, a standard hose can only clip onto the low-pressure side. In R-1234yf systems, the ports are also differentiated: 14 mm for low pressure and 17 mm for high pressure, with specific couplers that are not interchangeable with R-134a. In R-12 systems, both ports have the same 1/4" SAE thread: only the tube diameter allows them to be distinguished.
❄️ The special case of single-port vehicles (Renault and similar)
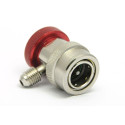
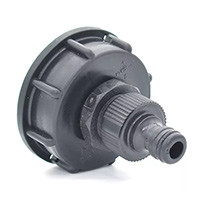
Some drivers, particularly Renault owners, look for their two service ports and only find one. Don't panic: this is not an error or an assembly omission. Certain models such as the Laguna II, Megane 2, Scenic 2 and 3, or the Kangoo 2, were designed by the manufacturer with only one visible service port. And this is where the situation becomes confusing for someone following a standard guide: this single port is of high-pressure type (16 mm coupler), even if it is sometimes physically located on the low-pressure line of the circuit. As a result, your 13 mm low-pressure coupler will simply not fit, no matter how hard you try. Some Renault low-pressure ports actually measure 16 mm instead of the usual 13 mm, which adds to the confusion.
One must absolutely not conclude from this that it is impossible to recharge these vehicles yourself, nor that one can connect anything to a high-pressure port on a standard two-port circuit. These two situations are fundamentally different. On Renault vehicles with a single port, the manufacturer planned for this configuration and there is a 16 mm high-pressure coupler or a dedicated HP→LP adapter that allows a standard recharge hose to be connected to this port. This specific equipment is designed to handle the pressure difference and to follow the particular procedure provided for these vehicles. You will find these accessories in our refrigeration tools category.
The specific procedure for a single-port vehicle is not the same as for a two-port circuit. It requires using only the equipment designed for this purpose, strictly respecting the quantities indicated on the vehicle label, and never attempting the operation with an unsuitable coupler. Forcing an incompatible fitting onto a pressurised port is not only pointless but potentially dangerous. On the other hand, once equipped with the right coupler, the operation can be carried out quite calmly. If you own one of these Renault models, the key is to first identify that you are in this particular situation — a single visible port, measuring 16 mm — before choosing your equipment. Also explore our range of eco-friendly refrigerants compatible with these systems.
❄️ Choosing the right fitting for your situation
Once the port has been identified and the situation understood, choosing the right equipment becomes logical. For a pre-1995 R-12 vehicle, you need a 1/4" SAE (7/16"-20 UNF) screw-on coupler, and you will need to have previously identified the low-pressure port by tube diameter, since both ports have the same thread. For an R-134a vehicle, the standard recharge hose sold in hardware stores or online is fitted with a 13 mm quick-connect coupler that can only clip onto the low-pressure port: the mechanical protection does all the work for you. For an R-1234yf vehicle (since 2017), the specific 14 mm couplers are not interchangeable with R-134a — an additional safety feature, but one that requires having the right tools from the start.
For Renault or similar vehicles with a single 16 mm port, the suitable high-pressure coupler or HP→LP adapter is essential. Without it, you simply will not be able to connect your hose, and that is intentional. You must never try to force, file or modify a port: air conditioning circuits operate under significant pressures and any uncontrolled access can cause a jet of pressurised refrigerant. Investing in the right adapter, available in our specialised fittings catalogue, is the only sensible approach for these vehicles.
❄️ Multitanks expert tip: If in doubt about identifying the low-pressure port, rely primarily on the tube diameter rather than the cap colour. Colour is not strictly standardised across manufacturers and can vary from one model to another. On the other hand, the large tube is always the low-pressure side, without exception. If you only find one port on your vehicle, do not try to force an unsuitable fitting: identify the "single-port vehicle" situation (common on Renault), obtain the dedicated high-pressure coupler or adapter, and follow the specific procedure. That is the only safe approach. Also check out our Errecom products to detect leaks and optimise your work.
Share this content